Last Updated on: September 11, 2024
Table of Contents
Infants can be victims of any mishap at any time as they are not aware of differentiating between right and wrong. Thus, parents and caregivers must learn how to perform infant CPR. In emergencies, one has to act fast because time is of the essence, and infants have tender and fragile bodies.
Cardiopulmonary Resuscitation for infants varies from that of adults in terms of techniques and pressure that has to be applied. About 7000 children are reported to have out-of-hospital cardiac arrests in the United States each year, stressing the need to learn how to handle such situations.
To familiarize you with CPR for infants aged 0-1 years, below is a step-by-step guide that can help you be ready for any scenario.
Baby CPR is defined as cardiopulmonary resuscitation performed on an infant who is unconscious and can not breathe. This condition may be caused by choking on food, toys, or other objects.
It entails applying pressure to the chest and giving the infant artificial breath to ensure that the heart is pumping blood and supplying oxygen to the important organs of the body. The basics are using hands to massage and circulate blood to the organs and supply oxygen until enhanced medical treatment arrives.
Before discussing how to give a baby CPR, it’s critical to ensure the situation is assessed accurately and promptly.
Tap the baby’s feet or shoulders and call the infant’s name while observing for any movement or signs of response. If the infant does not respond, then something must be done immediately.
If you are alone, perform CPR for 2 minutes and then call the emergency services. If someone is with you, tell him to dial 911 immediately.
Observe the movement of the chest, listen for the sounds produced while breathing, and check for air from the nose or mouth. Ensure that it takes less than 10 seconds to check for breathing. If the infant is not breathing or is only choking, start CPR on the infant right away.
CPR on an infant works to ensure the flow of blood to the major organs of the body, thus boosting the chances of living. Performing CPR involves proper chest compressions and other techniques, some of which are as follows:
This should be done on a firm, flat surface so that the baby does not move around much. Make sure the head is aligned parallel to the spine and that the infant is not wearing any clothing that will cover the chest area.
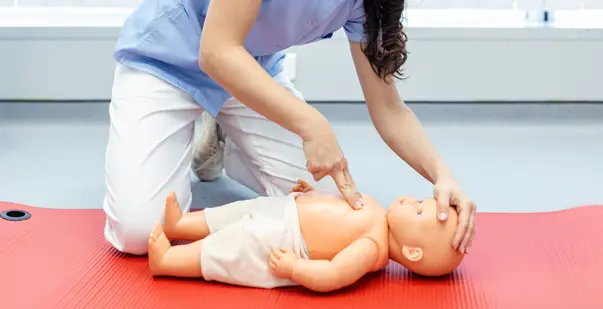
Two fingers should be used when performing single-rescuer CPR. Put hands on the chest, slightly above the waist level. For two-rescuer CPR, use the two-thumb encircle technique. In this method, both rescuers stand beside the infant’s feet.
The first rescuer compresses the chest with two thumbs in the middle of the sternum, below the nipples, while the second holds the infant’s head and gives rescue breaths. Fingers and thumbs surround the back to provide optimal and appropriate pressure on the chest.
Push forcefully and rapidly, trying to reduce the space available for the chest to about 1.5 inches. The compressions should push down approximately 1/3 of the chest’s depth. Compress the chest hard and allow the chest to return to the starting position before the next compression. Avoid any interruptions to maintain consistent blood flow.
The American Heart Association recommends a compression rate of 100-120 per minute. The infant compression to breath ratio is 30:2 if the rescuer is alone and 15:2 if there are two rescuers. To enable the child to keep the right rhythm, use a song with the correct rhythm, such as ‘Stayin’ Alive’ by the Bee Gees.
Once the chest compressions are done, the rescuer should give rescue breaths. Rescue breaths ensure that oxygen gets into the infant’s lungs, while chest compressions assist in circulating oxygen in the infant’s body. Read on to learn how to give rescue breaths properly:
Read more: How do you perform CPR on a drowned person?
Any small error when performing CPR on an infant can lead to severe outcomes. Thus, identifying potential mistakes will help avoid providing ineffective and even hazardous measures to save a life. The following are some common pitfalls that should be avoided when giving CPR.
Make sure that the compressions are about 1.5 inches deep or one-third of the chest depth. Compressions that are too shallow fail at circulating the blood well, while deeper compressions may cause internal harm on the other end of the scale.
It is equally important not to compress the xiphoid process, which is at the lower part of the breast bone, and not to compress too high on the chest. The hands should be placed correctly to avoid harm to the infant.
Each time you compress, ultimately ensure the chest rises. The full chest recoil is important because it allows the heart to fill up with blood. This process is essential for circulation and occurs without the infant’s efforts.
Try not to pause for long to avoid disturbances of blood circulation. Switching the rescuers every 2 minutes is advisable to avoid their tiredness. The regular compression is useful for the circulation of blood around the body.
Breathe softly so as not to blow in the stomach. Observe for signs of adequate breathing, such as the rise and fall of the chest. Overinflation can cause difficulties and decrease the efficiency of CPR
Learning how to give CPR to a baby involves understanding special considerations, such as handling situations like choking or hypothermia.
Read more: When To Stop Performing CPR?
This guide is useful, but it cannot replace the practical session. Certified courses provide the participants with real-life experience using infant simulators, trained instructor feedback, current skills and protocols, and real-life confidence when performing CPR.
CPR training also entails other areas of training, such as using AEDs (automated external defibrillators) in infants and managing exceptional cases like allergic reactions, seizures, legal issues, and Good Samaritan laws.
In addition to learning CPR, there are steps you can take to prepare for potential emergencies.
Knowledge of CPR on infant patients is important, and so is prevention. Here are some safety measures to reduce the risk of emergencies
Learning the basics of CPR on infant patients is one of the crucial competencies that parents and caregivers should acquire. Knowing all the correct techniques, the right compression ratios, and the possible things that could go wrong will put you in a better position to act in case of an emergency. As stressed earlier, timely response and correct CPR can help improve the odds of the infant’s survival.
Although performing infant CPR can be quite challenging, one must be prepared and confident about it. Be sure to act immediately. Please don’t wait for a tragedy to happen and lose confidence when it is time to save an infant’s life. Get certified in CPR today and learn everything, including how many compressions for infant CPR are required.