Table of content(s)
- Introduction
- What is infant BLS?
- Why is infant BLS essential?
- What are the steps for performing one-rescuer BLS on an infant?
- What are the steps for performing the second rescuer BLS on an infant?
- How to use an automated external defibrillator for infants?
- Steps to offer post-resuscitation care to infants
- What is the importance of seeking medical assistance?
- During infant BLS, what are the signs of successful resuscitation?
- What are the survival rates for infants who receive prompt BLS intervention?
- What are the common mistakes to avoid?
- What are the next steps in infant BLS?
- Conclusion
Infant life support is a skill that everyone should possess. The ability to respond confidently during life-threatening emergencies can increase survival chances. BLS covers simple steps such as responsiveness, performing cardiopulmonary resuscitation, and using an automated external defibrillator. These techniques are ideal for infants due to their unique physical needs. Knowledge of infant BLS can help caregivers and parents be prepared for emergencies. Understanding and practicing these skills can make you confident enough to respond and save a life during an emergency.
What is BLS for infants?
Infant basic life support is a set of life-saving techniques designed to assist infants during emergencies. So if there is an infant in cardiac arrest the next step is to perform BLS. These techniques especially focus on maintaining airway patency and ensuring optimum circulation until professional medical help arrives. The procedures of BLS differ significantly for adults and infants.
The key components of infant BLS include:
- Assessment: Check if the infant is responsive. Tap and call their name. If there is no response, proceed with the following steps:.
- Airway: Ensure that the airway is open. Gently tilt the head back and lift the chin. Do not overextend the neck, as infants have delicate airways.
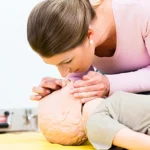
- Breathing: Listen, look, and feel for normal breathing. If the infant does not breathe normally or only gasps, then start rescue breathing. Cover the infant’s mouth and nose. Give gentle puffs of air, and watch the chest rise.
- Circulation: Check for a pulse. If you do not feel any pulse, start chest compressions right away. Use two fingers and press down on the center of the chest. Perform this at a rate of 100–120 compressions per minute.
- Defibrillation: Use an AED if available.
Why is BLS for infants essential?
Infant basic life support is crucial, and it enables individuals to respond effectively during emergencies. When you provide help on time, it increases the chance of recovery. Moreover, the training empowers caregivers and makes them ready to handle emergencies.
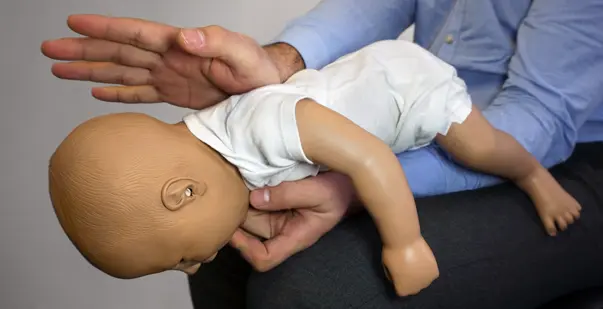
- Timely intervention: Infants are vulnerable to medical emergencies such as choking. Prompt initiation of BLS infant techniques provides immediate care and maintains vital functions until professional help arrives.
- Increased survival rates: Infants experiencing cardiac arrest need accurate interventions. This helps restore blood circulation and oxygenation. When infant BLS is well performed, it improves the chances of survival.
- Prevents long-term complications: Infants who receive effective BLS are likely to experience long-term outcomes. Adequate oxygenation can help prevent brain damage. It also minimizes the possibility of long-term health hazards that can result from a lack of circulation and oxygen.
- Boosts the confidence of caregivers and bystanders: Knowledge of BLS techniques makes you confident. Additionally, it also ensures that bystanders have the confidence and skills to take immediate action. This helps give the best possible care to infants.
What are the steps for performing one-rescuer BLS on an infant?
Infant basic life support follows an algorithm and ensures systematic and effective interventions. If you find yourself alone with an infant, here are some key steps to follow:
- Find the infant for unresponsiveness, abnormal breathing patterns, and absence from normal breathing.
- Check for the presence of a pulse in less than 10 seconds.
- Compress the chest to a depth of 1.5 inches. Use the two-finger technique at a rate of 100–120 compressions per minute.
- Give rescue breaths and cover the infant’s mouth and nose with your mouth. Deliver gentle puffs of air.
- Use a defibrillator or AED.
What are the steps for performing the second rescuer BLS on an infant?
Steps to perform the second rescuer BLS on an infant:
- Talk loudly or tap the bottom of the foot to assess the patient’s responsiveness.
- If the infant is not breathing and responding, send the second rescuer, call 911, and get an AED.
- Check if they are breathing while feeling for the infant’s brachial pulse for no more than 10 seconds.
- If you cannot feel a pulse, start CPR by doing 15 compressions followed by two breaths. If you can feel a pulse but the rate is less than 60 beats per minute, start CPR. This rate is too slow for an infant.
- Perform 15 compressions by one rescuer and two breaths by the second rescuer when the second rescuer returns. If the second rescuer can fit their hands around the infant’s chest, start CPR using the two thumb-encircling hands method. Do not press on the bottom end of the sternum. This can cause injury to the infant.
- Compressions should be 1.5 inches deep and at a rate of 100 to 120 per minute.
- Follow the prompts of AED to use it efficiently. Continue CPR until emergency medical services arrive or until the infant’s condition normalizes.
How to use an automated external defibrillator for infants?
AEDs with pediatric pads must be used for infants. Follow the instructions from manufacturers for proper pad placement. If you find an AED nearby, attach it to the infant as soon as possible and follow the visual prompts provided by the device. Continue CPR until medical help arrives or until the infant’s condition improves.
If it indicates a shock, then ensure that no one touches the patient. Shout ‘Clear’ prior to delivering a shock.
If the shock is not indicated, give CPR for two minutes and recheck the rhythm every two minutes. Continue CPR until advanced life support is available.
Read more: How to Use an AED: Step-By-Step Guide
Steps to offer post-resuscitation care to infants
It is crucial to provide immediate and effective post-resuscitation care to infants. Once resuscitation is successful, you can continuously monitor and handle infants to prevent further complications. Study key steps to take care of infants post-resuscitation:
- Monitor the infant’s condition: Keep monitoring the infant’s condition. Continuously monitor to keep a close eye on the breathing, heart rate, and level of consciousness. Even if the infant seems to be recovering, there might be complications attached.
- Keep the infant warm and comfortable: Maintain the body temperature of the infant. Cover them with a blanket and keep them warm. Make sure you do not overheat their bodies. Lie them down comfortably, preferably on their backs. Keep any obstructions away.
- Ensure they can breathe well: If the infant is breathing but unconscious, place them in the recovery position. Ensure that the airway stays open and prevents choking. Lay the infant down and keep their head tilted back.
- Reassess continuously: Keep checking the infant’s condition as long as emergency services do not arrive. Check their breathing and their pulse. Do not delay in starting CPR if the infant shows any signs of distress.
- Seek medical assistance: Call emergency services immediately after the initial resuscitation. Inform them of the infant’s condition and the steps you have taken. The infant needs a thorough medical evaluation to ensure that there are no issues that could cause further complications.
- Provide information to healthcare professionals: When emergency personnel arrive, provide detailed information about the incident. This includes the initial condition, the steps taken during resuscitation, and any noticeable changes in their condition. This will help healthcare professionals offer the best possible care for the infant.
What is the importance of seeking medical assistance?
After resuscitating an infant, you must seek professional medical assistance and ensure a complete recovery. Even if the infant appears to be stable, complications may exist that require expert evaluation. Medical professionals can offer advanced care, perform necessary tests, and monitor the infant for delayed symptoms. Timely medical intervention not only addresses immediate health concerns but also prevents potential future complications. This ensures the infant’s overall well-being.
During infant BLS, what are the signs of successful resuscitation?
Here are several signs to look for that indicate a positive response to resuscitation:
- Spontaneous breathing
- Improved heart rate
- Normal color
- Coughing or crying
- Regulates consciousness and becomes responsive, showing normal reflexes and movements.
- Shows improved muscle tone and responsiveness to stimuli
It is crucial to remember that the signs of successful resuscitation vary depending on the circumstances and the infant’s condition. Continue resuscitation efforts until professional medical help arrives.
What are the survival rates for infants who receive prompt BLS intervention?
Prompt support can improve outcomes. Studies have shown that infants receiving prompt BLS support have a higher chance of survival. The earlier they receive help, the greater their chance of survival.
When the resuscitation starts early, the chances of success range from 60–80%. When it is performed within 15 minutes, the success varies from 30 to 50%. Hence, start early to avoid complications and improve the health of the infants.
What are the common mistakes to avoid?
While performing BLS infant techniques, avoid common mistakes to ensure the effectiveness of the intervention and the safety of the infant. Here are a few mistakes to avoid:
- Incorrect chest compression depth and rate: Do not apply compressions that are too shallow or too deep. Make sure that you maintain the correct rate. The chest compressions must be 1.5 inches deep. Perform them at a rate of 100–120 compressions per minute.
- Improper hand placement: Do not place hands or fingers incorrectly on the infant’s chest. Use two fingers placed below the nipple line for chest compressions. Use both thumbs when you have two rescuers.
- Inadequate ventilation: Do not give breaths that are too weak or forceful. Give gentle breaths to raise the chest.
Most importantly, do not delay in starting CPR. Begin unresponsive infant CPR immediately if the infant is not breathing.
Read more: Effective Team Dynamics in CPR & BLS
What are the next steps in infant BLS?
After performing infant basic life support, activate the emergency medical services. Continue monitoring the vital signs of the infant. Document the details of the efforts and communicate them to the EMS personnel. Support the family, provide updates, and reassure them of the infant’s well-being. Participate in debriefing sessions and reflect on your efforts. These steps help you take good care of and provide emotional support to family members.
Conclusion
Master infant BLS techniques to be a responsible parent, bystander, and caregiver. It can boost survival chances during emergencies. Perform chest compressions, give rescue breaths effectively, and ensure medical assistance to provide effective care. Avoid the common mistakes and follow the guidelines to ensure that your efforts are safe. Stay updated with BLS for infant practices to act confidently in critical situations.